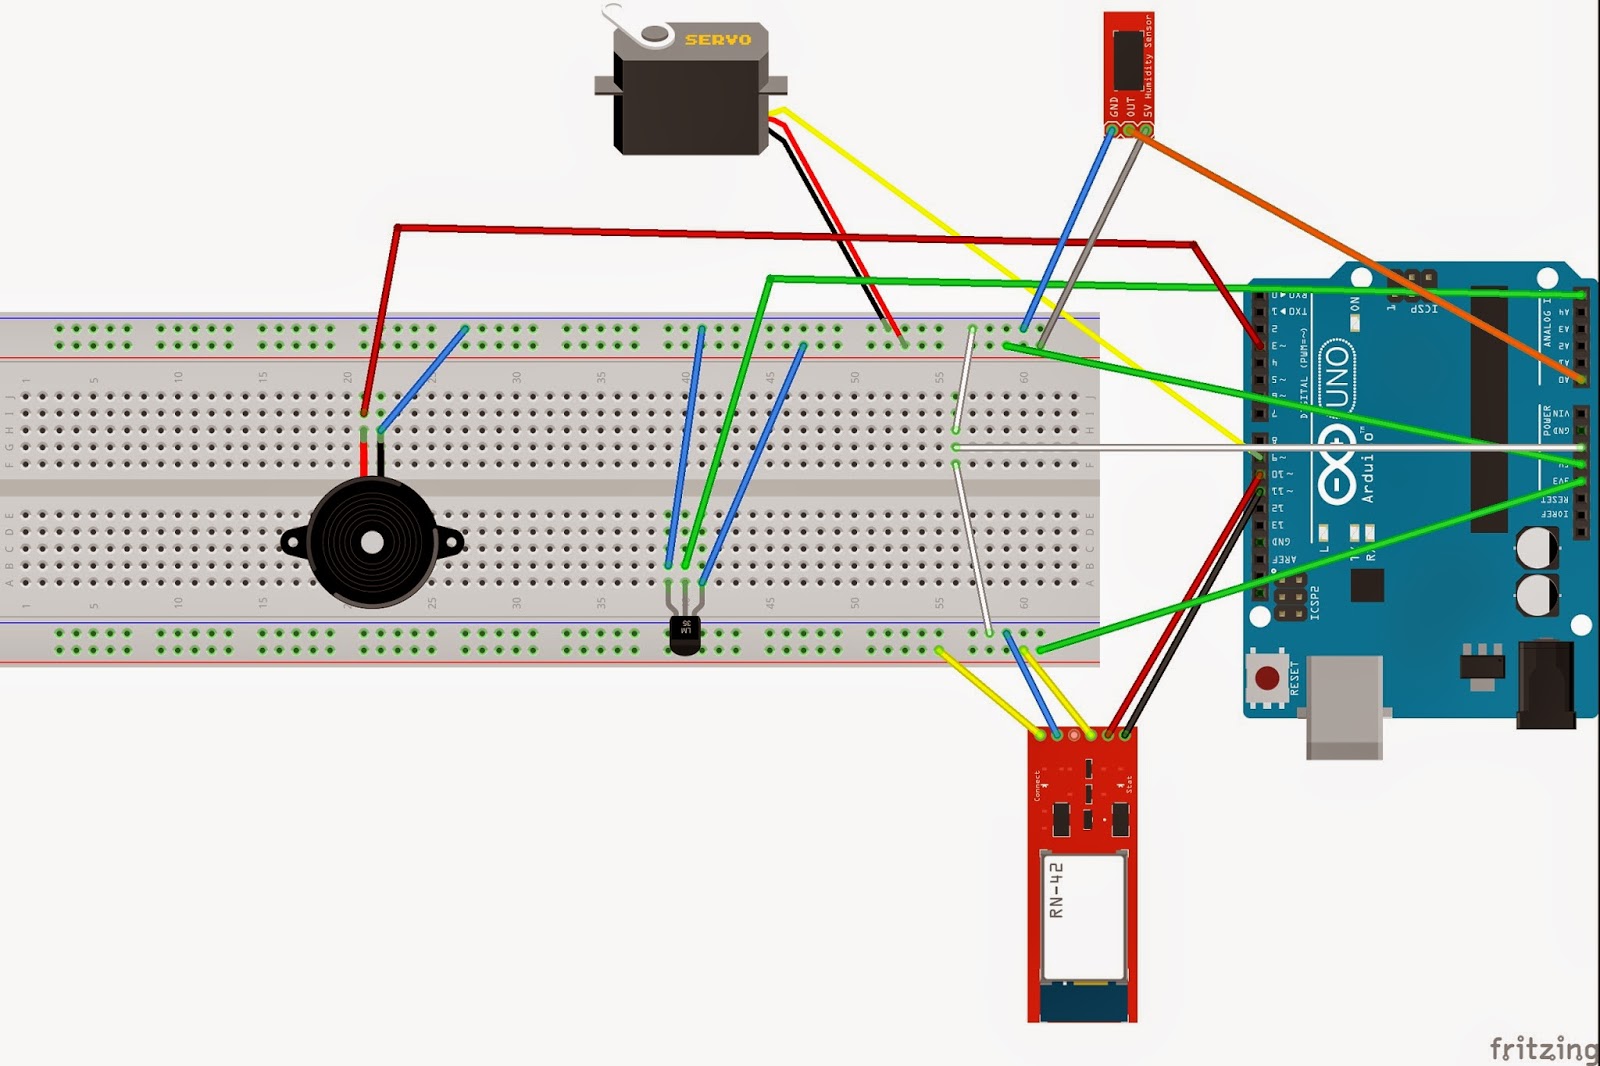
In this project our aim is to build an automatic watering system with using hydrometer sensor and arduino in the basis. System gets the information about humidity from hydrometer sensor in the soil and starts to water if plant becomes dry and thirsty to keep it alive. Auto Plant project has also temperature sensor for measuring the temperature in the air and alarm and automatic email service to warn the owner if water is finished. This project was built on Arduino IDE and with using hydrometer sensor, wifi module, temperature sensor, servo, buzzer and Arduino Uno board.
Equipment List:
·
YL-69 Soil Hydrometer Humidity
Detection Module
·
ESP8266
Serial WIFI Module
·
LM35
Temperature Sensor
·
Servo
·
Arduino Uno
·
Buzzer
·
Server
·
Jumpers
·
Board
We designed the
project according to an idea which is about keeping the plants living with automatic
running system. This system can be used by people who has limited time and who
has to travel frequently. So, we took this idea as an infrastructure for the
project and we designed an automatic watering system with some equipment which is
convenient to use with Arduino. First we figured out which kind of warning
system can be useful. We built an email service with using ESP8266 wifi module
and we send a message for the owner with the information about water in the
system and temperature. The project has two measured part which is temperature
and humidity, so our smart system measures them in every five minutes. We store
the information about normal humidity level and temperature rate on EEPROM and
when system read the values then it compares them.
An automatic
watering system is activated when water level is under the normal level.
Movement is provided by servo and some other equipment. Water is filled by the
owner and system starts an alarm if watering action is not handled. We designed
the alarm time as playing 3 times in 1 minute interval. When the user doesn’t
fill the water then system sends an email to the owner.
In
the designing part, we chose the TimerOne library for interrupts and time
intervals. Also we thought EEPROM was convenient for the project as a storage
position to keep the normal values of humidity and temperature.

Requirements :
Project has overall six requirements in particular
areas:
-
In
extra, hydrometer sensor, wifi module, temperature sensor and buzzer will be
used in this project.
-
In
this project, EEPROM will be used to keep the plant moisture ratio and
temperature level that it requires. Data will be used in comparison of read
value which comes from sensor reading and normal value which is called from
EEPROM.
-
Humidity
level will be measure in every 5 minutes to understand it is under the normal
level or not. So, timer will be used to check the time.
-
To
avoid the plant dead if water in the mechanism is done, buzzer will start as an
alarm until 5 minutes pass.
-
Owner
will be warned by the system with the information of temperature and humidity
ratio when they are not good for the plant. It will be done by wifi module and
connecting with the server. For example when the temperature decreased below
the normal value or humidity level then owner will be warned with using the
email message.
-
System
will water the plant automatically when the humidity level is less. So,
movement will be done by the servo. It will be connected with the Arduino and
also it has a connection with a container filled with water.
Arduino Code :
#include <SoftwareSerial.h>
#include <Servo.h>
#include <TimerOne.h>
#define DEBUG true
SoftwareSerial esp8266(10,11); //TX RX
Servo servo;
int hydrometerSensor = 0;
int lm35Pin = 5;
int buzzerPin = 3;
int duration=1000;
int frequency = 262;
int hydrometerValue;
int hydrometerValue2;
float temperature;
int flag = 0;
int checkBuzz;
int count = 0;
int checkServo = 0;
int info; //water is finished info = 1, temp is low info = 0
void setup(){
servo.attach(9);
// analogReference(INTERNAL);
pinMode(buzzerPin, OUTPUT);
Timer1.initialize(8000000);
Timer1.attachInterrupt(reread);
Serial.begin(9600);
esp8266.begin(9600);
}
void loop(){
int time1, time2;
if(checkBuzz == 1){
if(count>2){
noTone(buzzerPin);
info = 1;
sendEmail(info);
count = 0;
checkBuzz = 0;
}
else{
buzz();
count++;
}
}
if(hydrometerValue>900){
//servo
delay(5000);
hydrometerValue2 = analogRead(hydrometerSensor);
if(hydrometerValue2>900){
checkBuzz = 1;
}
else{
checkBuzz = 0;
}
}
/*if(temperature < 10){
info = 0;
sendEmail(info);
}*/
}
void reread(){
/*if(flag<15){
flag++;
}
else{*/
hydrometerValue = analogRead(hydrometerSensor);
int reading = analogRead(lm35Pin);
temperature = (reading*5.0*100.0)/1024.0;
Serial.print("hydro : ");
Serial.println(hydrometerValue);
Serial.print("temp : ");
Serial.println(temperature);
// flag = 0;
//}
//Serial.println(sensorValue);
//340 - 1023
}
void buzz(){
for(int i = 0;i<10;i++){
tone(buzzerPin, frequency, duration/2);
delay(duration);
}
}
void sendEmail(int info){
String response;
String cmd = "AT+CIPSTART=4,\"TCP\",\"yeicmobil.com\",80\r\n"; //make this command: AT+CPISTART="TCP","146.227.57.195",80
String val = "GET http://www.yeicmobil.com/android/cse342.php?email=email@email.com&data=";
val=val+info;
val=val+" HTTP/1.0\r\n\r\n"; //construct http GET request
String value = "AT+CIPSEND=4,";
value=value+val.length();
value=value+"\r\n";
sendData("AT+RST\r\n",2000,DEBUG);
sendData("AT+CWMODE=1\r\n",1000,DEBUG);
sendData("AT+RST\r\n",2000,DEBUG);
sendData("AT+CIPMUX=1",500,DEBUG);
response=sendData("AT+CWJAP=\"modem\",\"password\"\r\n",2000,DEBUG);
response=sendData(cmd,2000,DEBUG);
response = sendData(value,2000,DEBUG);
sendData(val,5000,DEBUG);
}
String sendData(String command, const int timeout, boolean debug){
String response = "";
esp8266.print(command); // send the read character to the esp8266
long int time = millis();
while( (time+timeout) > millis())
{
while(esp8266.available())
{
// The esp has data so display its output to the serial window
char c = esp8266.read(); // read the next character.
response+=c;
}
}
if(debug)
{
Serial.println(response);
}
return response;
}
Hiç yorum yok:
Yorum Gönder